A Deep Learning Model For Chest Radiograph Findings From Pneumonia Etiology Research for Child Health (PERCH)
Primary endpoint pneumonia (PEP) along with non-endpoint/other infiltrates (OI), and non-PEP/OI are defined by the World Health Organization (WHO) as endpoints of evaluation in vaccine effectiveness studies among pediatric population. This is a tool to detect these endpoints on pediatric chest radiograph. The project is written in TensorFlow 2.2. The original study is published on PLOS ONE.
The model was built using DenseNet121 and trained using chest x-ray images from the Pneumonia Etiology Research for Child Health (PERCH) study. The project also used CheXpert dataset for pretraining, and images from WHO-original and WHO-CRES (Chest Radiography in Epidemiological Studies) for testing.
Disclaimer: The definition is designed to be used in epidmiological studies which typically favors specificty over sensitivity, and thus is not meant to be used for clinical diagnosis where a higher sensitivity is preferred to reduce under-diagnosis. Some researchers have recommended dropping OI category from the WHO definition due to its low inter-rater agreement.
Visualization
Primary Endpoint Pneumonia
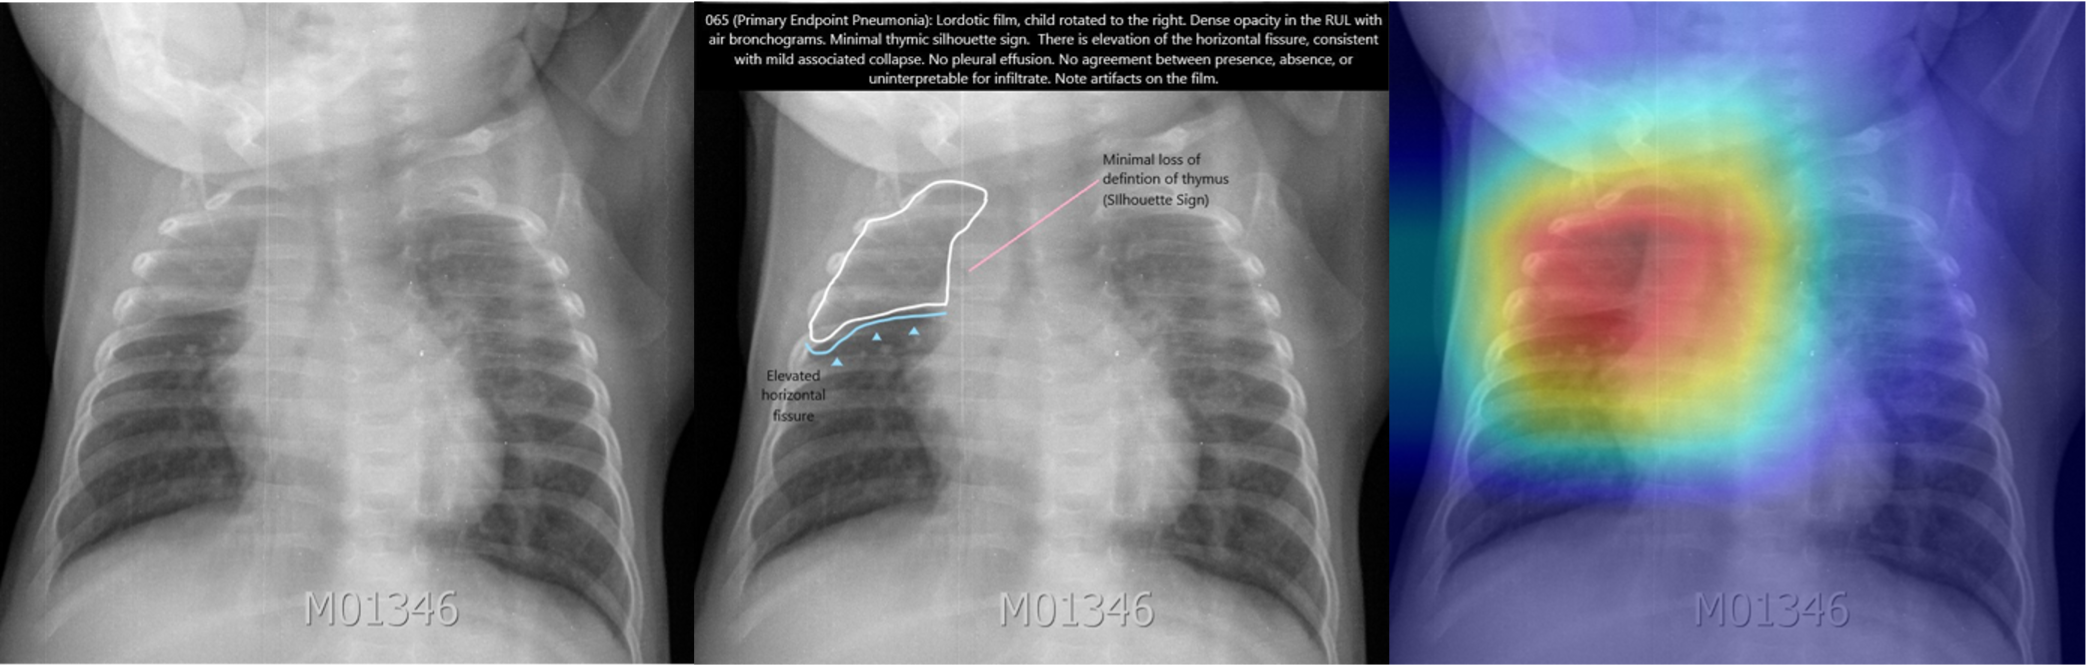 Frontal radiographs of the chest in a child with WHO-defined primary endpoint pneumonia; the child is rotated to the right with dense opacity in the right upper lobe; the model localizes consolidation with a predicted probability p = 0.980; the discriminative visualization shows fine-grained features important to the predicted class.
Non-Endpoint/Other Infiltrate
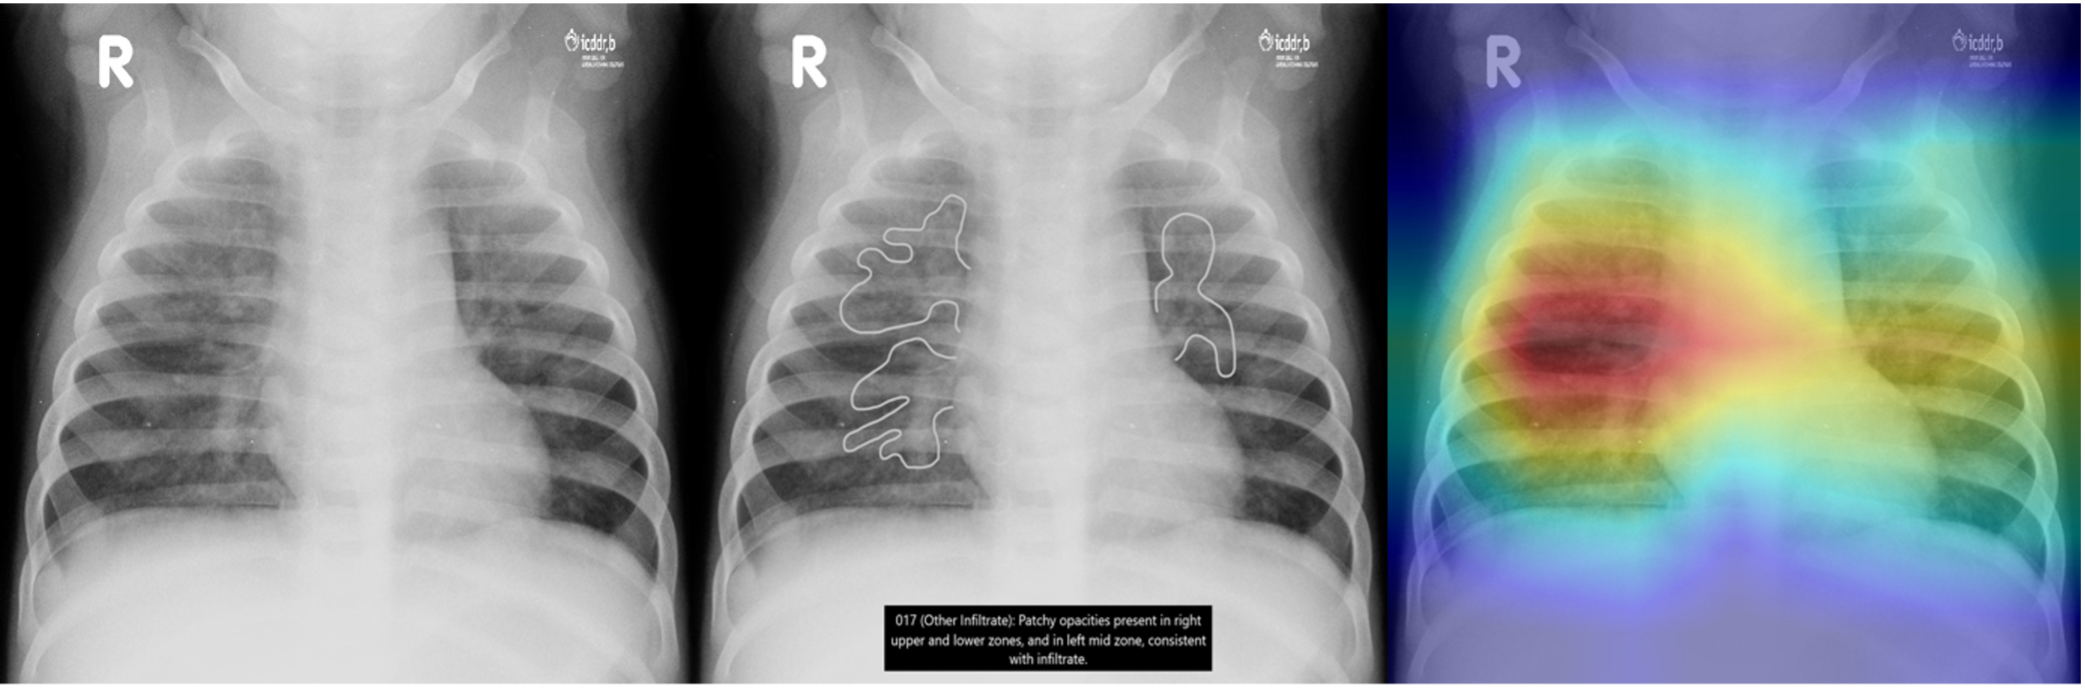 Frontal radiograph of the chest presents patchy opacity consistent with non-endpoint infiltrate. The model correctly classifies the image as infiltrate with a probability of p = 0.917 and localizes the areas of opacity. The class discriminative visualization highlights important class features.
User Tutorial
File Structure:
The folder WHO_images contains a toy sample of 9 randomly selected images (3 PEP, 3 OI, and 3 non-PEP/OI) from the WHO-CRES dataset. The folder saved_model contains a pre-trained weight file from the PERCH-CXR study.
Step by Step Instructions:
Note: The instructions work for the toy sample right out of the box. For training on your own data, modify the parameters in config.ini, and structure the data csv file as is in WHO_CRES.csv, with first column containing path to each image, and second onward column containing image labels.
- Run
pip install -r requirements.txtto install required packages. - Run
python generate_tfreocrd.pyto transform data into TFRecords file, an optional format for TensorFlow, recommended for working large dataset. - Run
python train.pyto train and evaluate the model. - Run
python test.pyto test the model. - Run
python grad-cam.pyto visualize model's prediction using Grad-CAM.
Config.ini File Explanation
- The file contains 4 sections (
DATA,TRAIN,TEST,GRAD-CAM), each corresponding to one of the 4 steps. - The
[DATA]section contains ashardingparameter. Sharding can be used to acheive a more thoroughly shuffled dataset in order to destroy any large-scale correlations in your data (see "How to shuffle in TensorFlow"). - When
n_fold>1, the training will run in n-fold cross-validation mode, and the results will be saved to n folders. - The
[TRAIN]section contains aclass_namesparameter. Its order corresponds to the order of outcome columns in the data csv file and determines the order of model outputs. If you are evaluating your pre-trained weight in a new dataset, remember to sort the outcome columns in your new data according toclass_names.
Author
Star Chen (starchen1440@gmail.com)
Acknowledgment
The study is sponsored by Merck & Co., Inc.
License
This project is licensed under the terms of the MIT license.